Cheap and Easy IOT
The Internet Of Things
Done with a $9 NodeMCU programmed with Arduino
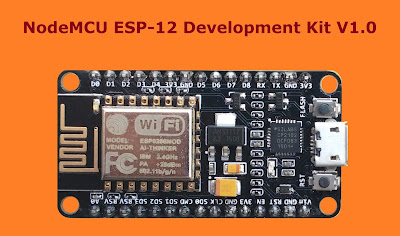
Lately I've gotten interested in the "Internet Of Things". I've been trying to find the cheapest and easiest way to get projects connected to the internet to receive data and send commands from the web. The best device I've found to do this with is the NodeMCU Devkit. They're readily available on Amazon for around $9. It uses the ESP8266 WiFi module that has great documentation online. It's only downfall is that it runs on 3.3v and is not 5v tolerant. Luckily many Arduino sensors work just fine on 3.3v.
I played around with several programming languages trying to figure out the best way to use this amazing little board. The NodeMCU can run AT firmware and be controlled by an Arduino just like the six pin ESP8266 modules but adding an Arduino to the mix adds to the cost and makes everything more complicated. ESPlorer is a great program and uses the LUA language and there's even places you can customize the firmware to have only the modules you need. The downsides are having to flash the firmware to the board and it doesn't have anywhere near the support for external devices as the Arduino IDE. Luckily you can easily add support for ESP8266 boards to the Arduino IDE.
To add support for ESP8266 boards in the Arduino IDE there's a few things you'll have to do. You'll need to be running the latest version of the Arduino IDE. In the IDE click "File" and then "Preferences". You should have a window that looks like this.
Near the bottom you'll see a line that says "Additional Boards Manager URLs:". You'll need to copy and paste this http://arduino.esp8266.com/stable/package_esp8266com_index.json in the box on that line. Next you'll need to click on "Tools" and go to the board selection tab. At the top of the list of boards you'll see "Boards Manager..." click on it and you'll get a window that looks like this.
Near the bottom you'll see "esp8266". Click on it and then click install. Now when you click on the board selection tab you'll see several options for esp8266 modules, including the NodeMCU.
We'll be using thinger.io as our IOT platform so we'll need to install the custom libraries. You can download them from Github and here's a direct link to the zip. Once you have the zip file you'll have to import it to your Arduino IDE. Open a sketch and click on "Sketch" then "Include Library" and "Add .ZIP Library" select your downloaded library and it's imported. Then still in the IDE click on "File" then "Examples" and you should see "thinger.io" with a sub-menu. Since we'll be using the NodeMCU you'll need to click on "ESP8266". This is a nice starter sketch that will let you control the on-board LED and send the time from millis to thinger.
Next you'll need to setup an account at Thinger.
Once you have an account setup you can add your device and generate a Device ID and a Device Credential. You'll need to enter these along with your username into the Arduino sketch. Don't forget to put your SSID and Password into the sketch as well. You can also install the Android app. Once installed you generate a key from the website and scan it with your phone's camera.
I could fill pages with the details of everything you can do with the NodeMCU and thinger.io but It's probably best if you just create an account and figure it out for yourself.
THINGER.IO
There's also great documentation available that should get you going in no time.
http://docs.thinger.io/arduino/
I've managed to setup two relays, a DHT 11 and a Dallas temperature probe fairly fast and easy. You can also setup "Endpoints" you can call from the code to send emails or trigger IFTTT and other services. It's all in the documentation and pretty easy to understand. The website also has customizable dashboards to view your data in a web browser.
Well, good luck and I hope this helps you get going with your "Internet Of Things" project.


Elinize sağlık, sade ve anlaşılır anlatmışsınız.
ReplyDelete